Friday, 27 September 2013

Oyster Tempura Recipe


The 59th Galway International Oyster & Seafood Festival will take place this weekend. It's the most internationally recognised festival in Ireland after St Patrick's Day attracting visitors from all over the world. Here's an oyster recipe with a Japanese twist to celebrate this wonderful festival.

Ingredients:
10 shucked and cleaned fresh oysters
150ml ice cold water
1 egg yolk

100g flour (sieved)
Half tsp corn flour (sieved)
Handful of ice-cubes
Seaweed (to garnish) 
Lemon wedges and sea salt (serve on the side)
Vegetable oil (for frying)

Instructions:
1. Gently wash the oysters and pat dry with kitchen towel. 
2. Place enough vegetable oil in a heavy base saucepan to be able to deep fry the oysters. 
3. Line a plate with kitchen towel as this will be used to absorb the excess oil from the tempura. 
4. Place the egg in a medium size bowl and beat using chopsticks or whisk. Pour the ice cold water into the bowl and mix with the egg.  
5. Add the sieved flour and corn flour to the water and egg. Mix lightly leaving small lumps in the mixture (at this stage you could sit the medium sized bowl filled with the batter into a larger bowl filled with ice and water to keep the batter cold). 
6. To check the oil is hot enough, drop a small bit of batter into the oil and if it sizzles up quickly to the top then the oil temperature is ok.
7. Gently dip the oysters (one at a time) into the batter, shake off the excess batter and place in the oil.
8. Only fry a few pieces in the oil at the time to ensure that the oil temperature remains hot. The pieces should be turned only a few times until they have a nice light golden colour. This usually takes a few minutes. 
9. Place the oyster tempura on your prepared plate lined with kitchen towel to absorb the excess oil.
10. Serve in the oyster shell topped with seaweed. Season with freshly ground sea salt and lemon wedges. 
Tips:
- To get a light and crispy tempura batter the oil temperature should be hot and the batter very cold.
- Do not over mix the batter, lumps are ok in the batter
- Before preparing the batter make sure everything else is ready so you can use it immediately.  
Notes:
To get some useful tips on buying, preparing and cooking oysters at home go to Clogadh McKenna's Guide To Oyster's

Friday, 20 September 2013

Yakisoba with Mixed Vegetables Recipe


I lived in a small village along the western coast of Japan called Nishiyama.  During the summer months the locals always invited me to their hiking tours which were followed by a barbecue on the beach.  This was the first time I ate yakisoba at a Japanese barbecue and it was amazing.  Yakisoba is also a  popular street food at Japanese summer festivals.  Outside of Japan, yakisoba is one of the most popular dishes on menus in Japanese restaurants.  It's easy to make at home so please give it a try.  This is one of my 2 year old's favourite dishes. 

This is a vegetarian dish but if you want to follow the traditional recipe include pork shoulder or pork belly (chicken and prawn go really well too). 

Ingredients:
2 garlic cloves (peeled and finely diced ) 
1 onion (peeled and finely diced)
1 carrrot (peeled and cut julienne style)
1 handful of beansprouts 
1 handful of savoy cabbage (finely chopped)
1 pack of egg noodles or ramen noodles

Homemade yakisoba sauce:
4 tbsp tomato ketchup
4 tbsp water
2 tbsp worcestershire sauce
1 tbsp sake or red wine
1 tbsp soya sauce
1 tsp sugar
Freshly ground black pepper (to season)

Vegetable oil (for frying)

To garnish (optional)
Nori (finely grated)
Beni shogu (red pickled ginger)

Serves 2 

Instructions:

  1. To make the homemade yakisoba sauce put all the ingredients for sauce in a saucepan and simmer for about 10 minutes until the sauce thickens to the same consistency as tomato ketchup and then set aside.
  2. Heat the vegetable oil in a frying pan/ wok and fry the onion until soft. Then add the garlic.
  3. Toss in the carrots and fry for a minute or so before adding the cabbage and beansprouts.
  4.  Place the noodles in a bowl of boiling water and untangle with chopsticks or a fork without breaking. Drain and add to the stir fry. 
  5. Pour the sauce over the stir fry and mix well.
  6. Serve on a plate and top with nori and red pickled ginger.
Tips
- Stir fry the vegetables to your liking but try not to overcrowd the pan.

Tuesday, 17 September 2013

The story so far....

I started this blog in 2012 after adding it to my New Year's Resolution List. It wasn't long before I was completely hooked always thinking about my next post. Month by month my followers grew from my circle of family and friends to people in Ireland and all over the world. People started to contact me directly asking me about my recipes and for advice on different aspects of Japanese cooking at home.

This year, Fiona's Japanese Cooking has opened so many doors and allowed me to meet a fantastic group of friends in the Irish Food Blogging Community that I wouldn't have met otherwise. I've learned so much from them and enjoy talking about food non-stop to people who share my passion.

Earlier this year, I was invited to a Ramen Experience in Wagamama's kitchen and got a unique opportunity to make ramen with Wagamama's head chef and trainer Juan Manteca. 


I started to run Japanese cooking classes from my home which will move to the Miele Gallery in Citywest from October to accommodate bigger groups and also make it more accessible for people. 

I did my first radio interview and I'm doing a sushi demo at one of Ireland's leading food festivals "Savour Kilkenny".  

Last weekend I was so excited to see Fiona's Japanese Cooking blog short listed for the Irish Blog Awards for the best food & drink category, fingers crossed!  

There are more exciting opportunities in the pipeline for later this year and early next year which I'm looking forward to sharing with you. If next year is as eventful and exciting as this year I'll be a very happy lady. 

I would like to take this opportunity to thank everyone for your support, likes, follows, and pins! A special thanks to my husband - for the photos accompanied by his patience! And my son - for eating some of my creations!

Saturday, 14 September 2013

The English Market in Cork - a foodie's paradise


When I was planning my family trip to Cork I had to include a visit to the English Market as I'd never been there and heard so many good things about it. 

We had no trouble finding it as it's located right in the centre of Cork city and its roofed style market makes it suitable for all weather conditions.

This market is definitely a foodie's paradise with a wide selection of food from fish caught earlier that morning to cerified organic fruit and vegetables. It's clear from walking around the market that the shop owners and staff are passionate about what they do and take great pride in providing good quality produce.


I was really impressed with the freshness of the fish and the knowledge of the staff. If you live locally and are looking for fish for sushi or sashimi then this is the place to go. Make sure to mention that the fish will be eaten raw and they'll recommend the best fish for this purpose. I was told that the best days for getting fish for sushi or sashimi is Thursday to Saturday.

Towards the end of the market we came across a store that stocks a wonderful selection of good quality Japanese ingredients.


When you've finished wandering around the market at your lesiure there's a lovely cafe on the first floor.

Thursday, 5 September 2013

Uramaki - inside out sushi roll recipe


At my Japanese cooking classes there's always particular interest in a type of sushi roll called uramaki. It's popular outside of Japan as the taste of the nori is not as strong since the rice is on the outside of the roll. It can be nicely decorated with sesame seeds, fish eggs or even finely chopped dill.
This recipe is a great finger food for entertaining at home for special occasions. I've added extra photos for this post to make you're sushi rolling challenge a little easier. If you'd like to attend one of my cooking classes you can email me at fionasjapanesecooking@gmail.com

Ingredients: 
320g Japanese rice, uncooked 
4 x nori sheets (halved)

Sushi rice seasoning 
Japanese rice vinegar 100ml
Sugar 2 tbsp
Salt half tsp


Sushi Filling
140g crab meat 
Half tbsp crème fraîche
Pea size dollop of wasabi paste
2 ripe mangoes (cut into long strips)
2 green apples (cut into long strips)
Few lemon wedges

You'll need
Cling film
2 sushi mats
Small water bowl
Clean damp cloth


STEPS TO MAKE URAMAKI SUSHI ROLL
1. Getting ready
Wrap the two sushi mats completely in cling film to avoid the rice sticking to them. Place a small bowl of water and a clean damp cloth on the table beside the sushi mats as you'll need these while you're sushi rolling.  

2. Click here to see how to prepare sushi rice

3. Putting the sushi rice on the nori 


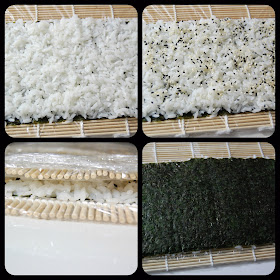
- Place half a sheet of nori shiny side down and the lines in the nori running vertical on a sushi mat. 
- Put about 3 heaped tablespoons of sushi rice on the seaweed.
- Quickly dip your hands in the bowl of water and use the damp cloth to absorb excess water (this should avoid the rice sticking to your fingers).
- Gently spread the rice all over the nori sheet using your fingertips. 
- Sprinkle sesame seeds over the rice. 
Place the other sushi mat over the rice and using both your hands press firmly but gently on the mat to secure the rice onto the nori sheet. 
- Flip the sushi mats around so the mat facing up is now facing down. 
- Remove the top sushi mat and you should see the rice facing down and the nori facing up.


4. Put the fillings on the rice as shown in the pictures below.


- Drizzle some lemon on the apple pieces to avoid them browning. In a small bowl mixthe crabmeat, crème fraîche and wasabi together. Place the ingredients in a straight line on the nori sheet as shown in the picture.
- Hold the nearest end of the mat with your index fingers and thumbs. Use the rest of your fingers to hold the ingredients in place. 
- Start to roll the mat forward and bring the nori and rice over the fillings. Press down firmly but gently to create a roll shape. To form the complete roll pull the end of the mat with one hand and continue to push the roll forward with the other hand (if some ingredients fall out the sides just push them back in and don't worry if the edges of the roll look untidy as this is ok). 
- Wrap the mat around the sushi roll to form a secure roll shape. 


5. Cut the roll
Wrap the roll in cling film (this will make it easier to cut). Place the roll on a chopping board and using a sharp knife cut in half (try to only cut in one direction). Then, using a damp clean cloth wipe the knife clean and continue to cut the two halves into four pieces and then cut the four pieces in half leaving you with eight pieces altogether. Make sure to remove all the cling film at this stage. 

6. Serve
Place on a plate and serve with pickled ginger, wasabi and soy sauce.
 
Helpful Sushi Tips:
  • Don't expect to make the perfect sushi roll the first time, it'll take a little practice but it's worth it in the end and looks very impressive!
  • Do not use other types of rice such as long grain rice. Only use short grain rice which is also called sushi rice.
  • You can buy ready-made sushi vinegar if you'd prefer not to make sushi vinegar from scratch.
  • Place a damp cloth over the sushi rice if you are not using it immediately to avoid it becoming hard and dry.
  • Try not to put the rice in the fridge, sushi rice can be stored in a cool place for up to 12 hours.

Monday, 2 September 2013

Chicken skewers with Greek yogurt and miso paste recipe


I love to spend time in my kitchen creating new recipes fusing Western and Japanese flavours.  For this recipe I'm using organic Greek yogurt from a fantastic Irish company called Glenisk and one of my favourite Japanese ingredients to cook with miso paste.  These ingredients can be used separately to marinate meat but they work even better together making the meat unbelievably tender and tasty.

Ingredients
2 x chicken breasts, cut into bite size chunks (preferably free range or organic)
5 tbsp organic Greek yogurt
1 tbsp Japanese miso paste
Bunch of spring onion/ scallion (cut into 2″ lengths)
Sesame seeds (to garnish)
Wooden skewers

Instructions:
  1. Soak the chicken skewers in water for about 20 minutes to avoid them burning in the oven.
  2. Preheat a fan oven to 180 degrees Celsius. 
  3. In a medium size bowl mix the Greek yogurt and miso paste together. 
  4. Toss in the chicken pieces and completely cover in the marinade. 
  5. Leave in the marinade for about 10 minutes.
  6. Thread about 3 chicken pieces and 2 spring onion pieces through each skewer.
  7. Cook in the oven for about 20 minutes.
  8. Garnish with sesame seeds 
  9. You can serve hot or cold. 
Notes:
You can use white or red miso paste for this recipe. White miso has a milder and sweeter taste compared to red miso.